|
Lay down License Plate and
Turn Signals
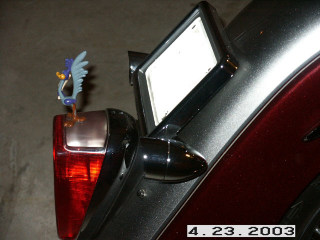 
This will allow you to have your rear
license plate lay down along your fender and for you to be able to
remove your rear moustache bar and signals. The signals will be
mounted on the side of your plate. The signals in the picture are
aftermarket just because I wanted something a little different. You
can do this with your existing turn signals also.
Step 1. Unbolt the moustache
bar by removing the license plate. Then you will see where the
license plate bracket bolts to. Remove this and set it
aside.
Step 2. You will need to unplug
the wiring connections and move them to the side.
Step 3. Remove
the reflector mounting bracket, take off the
reflectors and set it with the other bracket
and bolts.
Step 4. Carefully
remove the lower moustache bar bolts so as not to scratch your
paint. Remove the bar and set it in your extra parts bin, we won't
need this any more.
Step 5. Take the license plate
bracket and flip it over. This bracket will make your plate lay down
quite far. Bolt it up and see if you like it. If you want it a
little higher of the fender flip it back over. There will a way to
keep it off the fender coming up.
Step 6. The reflector bracket
will become your turn signal bracket, Abracadabra. The bracket will
need it cut in two places. You will be cutting off the middle
section that bends in. By doing this it will give you the ability to
adjust where you want the blinkers. Use a hacksaw to make the cuts
and file edges to remove ant rough edges.
Step 7. Trial fit. Place the
reflector brackets on each side of the license bracket that is
already mounted to the fender. You will be using the bolts held your
license plate to the bracket to secure these to the license bracket.
You need to check that they don't hit your fender.and get a feel of
what it will look like.
This part depends on whether you want to
keep your existing lights or not. If you are going with new light
skip to Step 10
Step 8. Remove the existing
turn signal from the moustache bar by removing the bolts at the
edge of the signals. Remove them with the wiring intact and the
rubber boot still inside th signal.
Step 9. You will need to go to
your local hardware store and get 2 hollow lamp fittings like shown
with 4 nuts that go with them. these
will slide/screw into the rubber boots and need to stick out about
1/2 inch from the signals.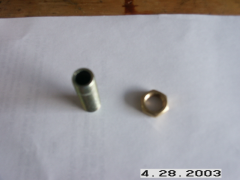 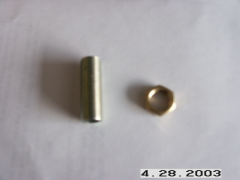 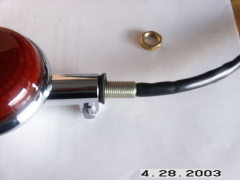
Step 10. You will notice that
the reflector bracket has permanently attached bolts that help the
reflectors on. You will want to cut the bracket right net to these
unless you like them for some reason. I rounded the corners on this
part and filed down the edges so they weren't sharp.
Step 11. Find the center of
this side of the bracket because you will need to drill a 1/2 hole
on each side to mount the lights to. Drill away.
Step 11a. Find the center of
this side of the bracket because you will need to drill a hole on
each side to mount the lights to. the size hole will depend on the
lights you bought. Drill away You should paint the brackets to
protect them and clean up the look some more.
Step 11b. You will need
to wrap the side of the lamp fitting that goes inside the turn
signal several times with tape( friction,
electrical ,duct tape, to thicken this part up some more.
Slip the rubber boot over this section. and slide it in the housing.
Tighten down the signal mounting bolts to secure it. Thread the
first nut on to the fitting and place the assembly through the
side mount bracket. Thread the next bolt onto the fitting and
tighten them down. Your signal should be very secure now, please
double check this part as the wind will be pushing on these.
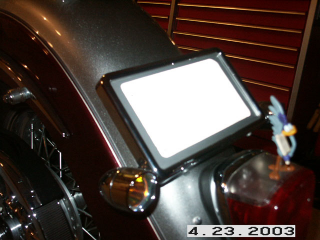
Step 12. Trial Run - mount the
lights to the brackets and the brackets will then mount to the
license frame inside the nubs on the license plate bracket.
They should be able to slide back and forth for adjustment on how
far out you want them to stick out from side to side.
Step 13. Shorten the wires
running to the signals and the brake light and use slip in bullet
connectors so you can disconnect them later. The reason is to keep
the extra wire sticking out as small as possible. Don't forget
to shrink wrap them. (Note: I took apart the existing plugs and
re-attached the wires after shortening them because I liked the
extra layer of protection. Also you may want to cover the wires in
black so they don't show if someone looks under the plate. Yes
people have done it and commented about it.)
Step 14. Mount the license
plate bracket tightly. Place your license Plate and frame on with
the bolts sticking through. Place the new turn signal brackets
to the license frame and put the nuts on the bolts snug. Now you
should be able to adjust the signals out to the distance you like.
Once done tighten them up.
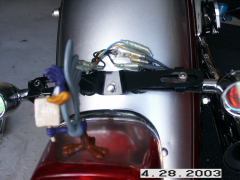
Step 15. All the wiring should
be hidden underneath the plate and the plate should be sitting on
your fender.
Step 16. Remove one of the
rubber plugs on your cooling fins or something similar. This will go
under the plate to hold it off the fender. Mine is right above
the bracket so you can't see it but it hold the plate off the fender
by just a hair.
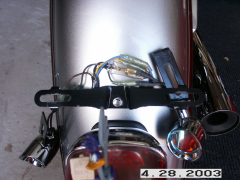
Step 17. Step back and admire
your new smaller rear end. If only it was this easy to lighten all
rear ends huh?
| 


